Thursday, September 30, 2010

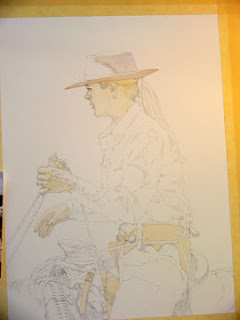
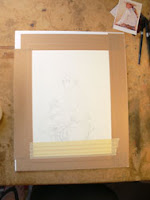
Trina: Day 7. Creating Definition.


     Well, we’re now winding things down nicely.  Now’s the time when I ditch my photo and add darks and definitions throughout the painting.  Little indications with Sepia create definition in the saddle.  I also place one more medium wash of Cobalt Blue and a touch of Alizarin Crimson on Trina’s shirt.
     I also place another warm wash of Cadmium Red on Trina’s hands.  My thoughts now turn to warming the background up a bit.  With her blue shirt, a complimentary warm earth tone should make the painting sing.

All content and images © Mark Kohler Studio.

Wednesday, September 29, 2010

Trina: Day 6. Never Let Your Guard Down!


     I feel Trina’s hair needs some more definition, so I use Burnt Sienna and a new color not listed in our original palette (Raw Sienna) to get a bit closer to her hair color.  I keep building layer after layer and the painting is starting to come together nicely.
     I feel like my painting is going really well, but I never let my guard down.  Every artist has had a painting swerve for the ditch at the eleventh hour.  Trina’s face seems a bit weak, so I add one more light wash of Cadmium Red.
     From here, things are going to move slower and in smaller increments.  It’s time to refine and make small color adjustments.  I put in a light Raw Umber on Trina’s romal (or reins), and call it a day. 

All content and images © Mark Kohler Studio.
  

Tuesday, September 28, 2010

Trina: Day Five - It's All About The Saddle


     Welcome back to our painting!  We start off today by painting a broad wash of Van Dyke Brown on the saddle skirts and begin defining areas of the saddle using Burnt Sienna and Raw Umber, as well as mixtures of the two.  I also put an extra wash on Trina’s belt.


     I then put a weak wash of Burnt Umber grayed with a touch of Ultramarine Blue.  I want to get some background in so I can start integrating my subject into some type of atmospheric background.  Notice that I’ve indicated the horse’s mane and the small portion of his neck.  I’m keeping this simple now but may add more information as I go.  I’ve taken some Sap Green and a touch of dirty blue off my palette and quickly indicated the stripes in Trina’s saddle blanket.


     A few more darks are added to the saddle and I start picking away at some of the saddle detail.  That’s enough for today!

All content and images © Mark Kohler Studio.

Monday, September 27, 2010

Trina: Day Four


     OK, today I begin by using my purple mix of Ultramarine Blue and Alizarin Crimson to put some darks in Trina’s hair.  Study your photo and keep your strokes wispy when doing the hair strands.  I also mix up a large puddle of my purple mix, and then add about 1/3 Cobalt Blue to this mix.  This is my first shirt wash and will separate the shadow side from the lit side.
  

     My next step is to paint a weak Raw Umber mix on most of the saddle as a base tone or under-painting.  I spend the majority of my time focusing on the shadow side of Trina’s leggings.  I put an under-painting of Burnt Umber and Ultramarine Blue, then drop salt into this wash.  The salt creates texture, which simulates the weathering on the leather.  I dry this wash, and then paint the cast shadow over this wash.  (This section took longer than my 15-minute allotment, so make sure you don’t rush.  Take your time!)
     Tomorrow we'll take a break from our painting, and on Monday we start adding some depth to our painting.  See you then!    

All content and images © Mark Kohler Studio.

Saturday, September 25, 2010

The Fortress

     This weekend, while we're taking a break from our portrait of Trina, I wanted to introduce you to another cowgirl in my repertoire.  Her name is Heather Coombs, and she lives and works on the Smith Creek Ranch in Nevada.  Here is her story:


     Painting Heather is easy... titling the painting always leaves me at a loss.  I feel compelled to illustrate her in a fair light.  Words and descriptions come fast.  Heather is the glue that keeps all around her together.  She is virtuous; she can be a rounder... while at the same time, fiercely God-fearing.  She takes care of dogs and horses with the caring instincts that only a woman possesses.  Yet she can bury her emotions and make the hard decisions when necessary.  Typical of working ranch women, she asks for nothing.  She just presses on, for the demands of work never wait. 


All content and images © Mark Kohler Studio.

Friday, September 24, 2010

Trina: Day Three


     Today, I use the same mix I used on the hands (a mix of Burnt Sienna and Alizarin Crimson) and apply this same wash over Trina’s face.


     This second color is very close to her skin tone in the photo.  Notice that there is a lot of reflected light from her white shirt and a bright sunny day.  Take care to preserve her earring.  I painted around it without masking fluid.


     I then spent the next 60 minutes painting the skirt of her leggings, using Burnt Sienna.  And then I used a weak wash of Indanthrene Blue on the jeans.  I start thinking about a good shadow color for her shirt and try a small wash on the collar of her shirt.
     That’s enough for today.  See you tomorrow!

All content and images © Mark Kohler Studio.

Thursday, September 23, 2010

Trina: Day Two. It's In The Hands.


     Today, we’ll go slowly with this step.  I tackle my first washes in the hands.  I’ve already titled the painting “Light Hand”, and Trina’s hands are the focal point of the piece.  I want to really spend some time here, since they are so integral to the painting.
     I also add some Burnt Sienna to her hair.  The hands are a mix of Burnt Sienna and Alizarin Crimson.  I lean a bit to the Sienna side.
     Take your time and concentrate on this important phase of the painting.  We’ll accomplish more tomorrow. 

All content and images © Mark Kohler Studio.

Wednesday, September 22, 2010

Trina: Day One


Today, we begin our demo, and the portrait of Trina.  I plan to move through my painting as I would if it were not a demo.  I will be bouncing around my painting, which I try not to do when doing a demonstration.  I will photograph my progress in 15 minute intervals so you will be able to see the process.


     Once again, here is my palette:
New Gamboge                                                Van Dyke Brown
Burnt Sienna                                                    Brown Madder
Alizarin Crimson                                              Indanthrene Blue
Ultramarine Blue                                              Cadmium Red
Cerulean Blue                                                   Cadmium Orange
Cobalt Blue
Burnt Umber                       
Raw Umber


     I begin with a weak mix of New Gamboge and Burnt Sienna in the face, hands, skirts on her leggings and parts of the saddle.  I add a weak purple mix of Ultramarine Blue and Alizarin Crimson to Trina’s buckaroo style hat.  These are early washes that serve as the underpainting and get my painting going.

All content and images © Mark Kohler Studio.             

Tuesday, September 21, 2010

"Animal Painting & Anatomy" - A Forgotten Gem

     A good friend of mine, and a fantastic sculptor, Jason Scull gifted me with a wonderful little book titled Animal Painting and Anatomy by W. Frank Calderon.  Mr. Calderon credits himself as being the Founder and Principal of the School of Animal Painting (1894-1918), as well being a sometime lecturer on Animal Painting at The British Royal Academy.
     No single anatomy book carefully covers foundational drawing, painting and animal anatomy as does Calderon’s book.
     Mr. Calderon, like any master teacher lines us all at the same starting point:  charcoal in hand, with measuring tools and seeing how they relate to drawing.  The quality of drawings in this book are simply amazing.  My personal favorite is a working sketch for a painting of the Irish Wolfhound “Gelert” killing a mature wolf.
     Mr. Calderon’s succinct and accurate drawing style offers all artists, from beginners to pro, an insight into the importance of the working sketch and how it relates to finished painted works.
"Gelert"
     So many young artists find themselves dazed and confused when confronted with composition and its subjective nature.  Mr. Calderon gives us large amounts of insight on this matter.
     Part 2 of the book is strictly anatomy of the ox, horse, dog and sheep.  However, Calderon throws in some interesting asides, including anatomy of the African Lion.
     You may be thinking that this book doesn’t pertain to your subject matter, but I beg to differ.  I have on many occasions found the anatomy references priceless.  If you’re a landscape painter, the occasional bovine is always present, but never idle.  This book has great drawing references. 
     If you enjoy painting dogs, I know of no other books except for William Secord’s books of historical paintings of the breeds that will serve you so well.  For you painters of the horse, Calderon picks up where Rien Poortvliets book of Horses touches, but doesn’t fully delve into.
     Amazon is a good place to start nailing down this book for your collection.  The bad news is a new copy will set you back $75.  The good news is they have several used copies and they’re in the $10 range.  Don’t tarry!  They will start disappearing quickly.
      This is a fantastic little book that will serve you well.  You will not be disappointed!

All content © Mark Kohler Studio.
     

Monday, September 20, 2010

From The Whale's Rib


     Today’s post will be a short one, but don’t let that mislead you.  I want to introduce you to a little friend of mine.  He may seem innocuous and mundane, but this little tool can be a workhorse for your workspace. 


     It’s called a bone folder.  You’ll find it’s real job description when you research the handwork involved in bookbinding.  But the bone folder has made a valuable transition to the watercolor fine artist’s side of the ledger.  I wouldn’t be caught dead without mine.

     Here’s a small list of what I use mine for:
1.  Scoring watercolor paper.
2.  The final press fold prior to tearing paper.
3.  Burnish my tape (as noted in last week’s post on the Marsh Taper).
4.  When I gold leaf mattes, I use the folder to burnish and polish the leaf.
5.  When making hinges during the framing process, the folder sets the seal on wheat paste/glue folds.  This involves hinging your artwork for display.
     Let me show you the most useful purpose for you as a watercolorist.  Most artists know this process, but in the past they have used an inappropriate tool.  Most did not know that the bone folder was made for this specific purpose.  If you have creased your high dollar paper with a spoon, pencil or brush handle, you’ve been in the company of most artists.  The problem with these methods is they leave residue, such as the spoon which will leave a metal residue as the paper polishes its’ surface.  The pencil, brush handle method leaves yellow or black paint on your paper.  Try this!
     Photo 1.  Lay your straight edge on your paper.  Take the point of your folder and press and pull, scoring the paper.


     Here’s the paper after the score line has been completed.


     Now use your finger and fold the paper on your score line.  Run your finger all the way down to create the first fold.


     Now take your folder and re-press your crease with the folder.  (This is the part we would improvise with the spoon or pencil).  You can really bear down on the paper with the folder and not do any damage.  Now reverse the fold and repeat the process.


     Your crease is now so well defined, that tearing the sheet requires little effort.  On handmade papers, like Twin Rocker, you will have a nice somewhat deckled edge.


     Now you know!  Looking for a bone folder?  Try Artisans in Santa Fe, Daniel Smith Art Supply (look in bookbinding supplies), or Dick Blick.  All are available online.   

All content and images © Mark Kohler Studio.    

Saturday, September 18, 2010

Trina: Our Next Demo


     Meet Trina Campbell.  She lives in Wheatland, WY, and is the wife of the well-known horse trainer and cowboy, Peter Campbell.  She will be our new demo subject, and this is the photo you can draw from.
     This demo will be posted, beginning Wednesday, and cover the time span that I am traveling to my show in Cody, WY and then on to Montana and Nevada to photograph subjects for new paintings. 
     I am also painting this in a larger format---about 8.5 x 12---so I thought I would give you time to complete your drawing, should you decide to follow along.  AND I am going to try to have a video for you at the end of the demonstration, so you can see the whole process up to the finished product.  My palette will be the following, so you can make sure you have all the necessary paint you will need:

New Gamboge or Indian Yellow                                    Van Dyke Brown
Burnt Sienna                                                                    Brown Madder
Alizarin Crimson                                                              Indanthrene Blue
Ultramarine Blue                                                              Cadmium Red
Cerulean Blue                                                                  Cadmium Orange
Cobalt Blue
Burnt Umber
Raw Umber

Good Luck! 

All text and images © Mark Kohler Studio.
   

Friday, September 17, 2010

Pennsylvania, Kansas and A Little Hog


     Here’s a detour from “art talk” and another tale from my Sabinal, Texas days.  My friend, Maurice (see the blog post, A Good Man, dated 7/14/10) had a bow hunting operation on a neighboring ranch there in Sabinal.  We spent the day riding in the truck and talking trash.  We decided to make the corn run for Maurice’s bow hunters about 4 pm.  We stopped at headquarters, where another “ranch manager” (actually a neophyte from Kansas) stopped us for some small talk. 
     Interestingly enough, he had a box trap in his truck, in which resided three rather large and toothy boar hogs.  We pitched right in and helped this NKRM (Neophyte from Kansas Ranch Manager) offload his three hogs.  I should be a bit more descriptive here, so you get a good mental picture.  This box trap is only 5 feet long by 3 feet wide and 3 feet tall.  Somehow three 150-200-lb. boars, all black, all mad, and all with big cutters have jammed themselves through the hinged door and into his trap. They can’t move, and there’s no going forward, and no reverse.
     So about this time, Mr. Kansas decides he’ll have a nice Copenhagen break while he chats with us and he sits on top of his trap while we chat.  Here’s where the learning opportunity comes in.  This may seem a bit obvious, but never, I repeat never, sit on a box trap with a 200-lb. boar under your butt.
     In 2 seconds, he was cut stem to stem.  It happened so fast he didn’t believe it.  When I told him he had a 3-inch gash that would require stitches, he was secretly wishing he was back in Kansas.  Maurice was biting a hole in his lower lip to keep from laughing out loud, and also secretly wishing this guy would go back to Kansas.
     Mr. Kansas headed for town and we headed out to make the grain run.  A grain run in South Texas consists of driving a route with a corn feeder on the back of a truck.  Maurice’s route required two barrels, each holding 300 pounds of corn.  We made the first run and refilled to start the second half, when we came across one of Maurice’s hunters.  This hunter was from Pennsylvania and had never hunted hogs with a bow before.  Mr. Pennsylvania was ecstatic.  Just prior to our arrival, he had shot his first somewhat small South Texas hog.  In his opinion, he didn’t think the hog was that big.
      Now, at the same time, and typical of Texas weather, a late November “blue norther” was building in the northwest sky.  Low and blue-black skies would soon be pushing dust, and then the temperature would be dropping into the low 30’s.  Maurice instructs Mr. Pennsylvania we needed to secure two blood-trailing dogs and would return to trail up his little hog.  We return and turn out two cur dogs named Cassie and Diamond at the location where the hog was hit and the race is on!  They trail for 80 yards and bay.  (A dog “baying” means they are barking in the face of our hog, letting us know where they are.)  We strike a run and as we close on their position, what was supposed to be a little nothing hog is 300 lbs. of super-deluxe pissed off South Texas boar hog with huge teeth.
Me and Mr. Pennsylvania's
Little Hog
     And, you guessed it!  The “blue norther” hits with a fury!  The wind starts blowing so hard; we can’t hear the dogs and visibility drops to about 60 yards from blowing dust.  I know Maurice is growing concerned because he asks me if I have my gun.  I confirm I’ve got my .45 Long Colt with 6 rounds in the chamber.  Maurice has a .22 with 10 rounds.  Should be sufficient!  We walk a mile listening for the dogs…. Nothing.  We walk another mile…. One faint bark.  We listen… we walk …. we listen.   Finally, a faint bay bark… 200 yards … we hit a dead run. 
     Mr. Pennsylvania falls behind.  We cover another half mile.  The dogs are baying a small white brush thicket.  We come in down-wind and quietly I ease around the big hog’s position.  The dogs are looking right at him, but we can’t get a visual.  I get on my hands and knees to look under the brush canopy and there it is!  One huge eye is looking right back at me!  Maurice says, “Watch the dogs and take the shot.”  The hammer falls and all hell breaks loose.  The hog runs over Cassie and hooks Diamond and throws him 6 feet in the air.  He receives a gash about like Mr. Kansas’ new cosmetic addition.
     Diamond latches on the boar’s hind end and sets the brake.  Maurice and I close the distance again.  The hog starts fighting both dogs and things are really escalating now.  I close in and shoot three 200-grain solids.  I hear Maurice hammering with the little .22.  The hog is showing no response.  Adrenalin, dogs, tusks…. Everything is a blur.  Then in a flash, he turns and leaves out.  He goes 20 yards before Diamond puts another catch on his flank.  I fire again at the neck junction, trying to anchor the boar.  He stumbles and falls.  Cassie won’t quit until Maurice scolds her.  He takes a visual reading of our location and we start the long walk back. 
     Mr. Pennsylvania meets us halfway back and Maurice hands him 6 feet of rope.  “You’re going to need two more friends to drag your little hog back to camp.”  He tells Mr. Pennsylvania where his hog is, as well as where the nearest road is, and we head for the truck.
     Here’s the moral of this story:
     1.  If you’re from Kansas, check the ground rules for Texas.  Especially the page about hog traps with boar hogs already in them.  On that page will be instructions about criteria for sitting on the trap.
     2.  If you’re from Pennsylvania, a little hog will be one smaller than a love seat.


All content and images © Mark Kohler Studio. 

Thursday, September 16, 2010

It All Starts With You!


     I have a good art friend who is frustrated.   He’s climbed several rungs of the art ladder and now finds things getting difficult.  Let’s get one thing straight.  This economy is tough.  As if being a full-time artist isn’t enough to deal with, now the economy is throwing punches.  Marketing art is different for every artist, and the process won’t be the same for any two.  We all develop unique ways to sell and market art, and to my way of thinking, you need to be doing them all to keep the canoe upright and facing forward.

     Marketing artwork is a horse of many colors: outdoor art shows, box shows, museum shows, websites, galleries, commissions, direct mail, thank you notes, referrals, email and much more.  You’ve spent time, effort and money to gain the necessary skill level, painted it and framed it.  Now the hard work begins.  As artists, we must move in and out of all these marketing venues and master as many as possible.
     Many beginning artists are of the opinion that a gallery or a specific show will make their career.  It won’t.  The same holds true for magazine editorials.  When you’re first starting out, that elusive press just can’t be found.  They won’t give us a break when we need it.  But once we’ve had some success they generally become interested.
     So one thing you need to know is that these avenues don’t always come at the right times.  When it comes to your early career, it’s got to be you!  What does this mean?  Don’t be reactive.  Waiting for the ultimate gallery to call, or acceptance by a top-flight show might take awhile.  But, as I said, these little victories will come if you persist.
     Today’s post is about “the meantime”.  In the meantime, you must take your marketing efforts by the horns.  What are some things you can do?  Here are several ideas to get you started.
     These eight ideas are foundational and basic.  If you’re not doing these, then you’re not mastering basics, which means you’re not trying to be a pro.  (If you’re not sure what this means, then go back and re-read my post on “The War of Art”.)  Get these eight skills covered and you’ll be well on your way.
     Starting with #8:  Thank You Notes.  Get one of your images printed on a thank you card and send them after every sale.  No single act will endear you to your customer and work for referrals than handwriting a “thank you”.  I send them religiously and they continue to pay off.
     #7:  Newsletter.  Whether printed or email generated, both are effective.  People are generally interested in what you’re doing and your process.  They want to know where you’re going and where they can see you next.  Don’t discount the power of staying connected with your friends and customers.
     #6.  Pre-mailing images.  Send your customers a one-page flyer of your recent work.  Buying artwork is a visual process.  Give them something visual.  I always send a flyer of available paintings prior to attending a show.  You’ll be shocked when they come to visit because one particular painting is speaking to them.
     #5.  Email.  You have the ability to direct mail your entire list of friends and customers from your studio.  No direct mail printing cost, no stamps, no middleman.  Send them images and prices.  Never ever spam your list.  And don’t add someone to your list who didn’t request it.
Try dazzleprinting.com or
 4over.com
     #4.  Business Cards.  This is one of the most overlooked and under-appreciated arrows in your quiver.  I have a sculptor friend, who is very good, but his card is black and white and has the word “sculptor” printed on it.  For a small cost increase, you can have a four-color image of your product, so your customer can see what you can do.  If you’ve got a badass card, it will never get thrown in the round file.  Here’s my card:
     #3.  Website.  No excuses for a less-than-spectacular website.  There are many good templates that allow you to move paintings in and out of your gallery pages.  Change your images often and photograph all your work.  Nothing says I’m a professional like good work on a great website.  Try bludomain.com.
     #2.  Mailing List.  Next to the upcoming #1 spot, nothing, and I mean nothing, is more important to your success than your mailing list.  Guard it with your life.  If you take care of your list, it will take care of you.  Make sure you ask for everything…. Address, phone, email and the dog’s name, if you can get it.  The customers will start out as customers, but they will become so much more.  Some prefer to keep you at arm’s length and are only interested in collecting your work.  Others will treat you like family.  Reciprocate.  They collect your work, initially, because they like your work.  But if they like you they will continue to purchase paintings.  Pam and I work at making friendships with our customers.  And we have been rewarded with people who have become good friends and we consider them family.  They are some of the most interesting and stimulating people we have met.  (Some of them even bless you with a saddle chair for your studio).
     #1.  Paint good paintings.  Nothing will do more to launch you down a successful art path like exceptional work.  Do work that is so mind-blowingly good that the galleries will begin calling and the acceptance letters for the shows will begin to materialize.  They can’t ignore you if you do exceptional, original work that is presented well. 
     We’ve all seen a young artist burst on to the scene, completely unknown, and rocket to the top.  It’s rare, but it happens.  His work will be ahead of its time and astounding.  More often than not, he has employed many, if not all, of these methods of marketing.  You, too, can do it.
     So there it is, a starting place.  Art is very much a game of survival.  The longer you hang in there and don’t give up, the better your chances are for success every day.
     Hope this helps.  Good Luck!

All content and business card image © Mark Kohler Studio.

Wednesday, September 15, 2010

There's A Line Between Dignity and Being A Dancing Monkey


In today’s world of marketing, every artist has major decisions to make regarding their work and how it’s presented.  How marketing affects your collector’s perception of you and your brand is vital to your continued success.
     Many artists become somewhat obstinate about having others dictate their artistic path, but come to the wrong conclusion and you can spend the next 10 years trying to get a bad decision back.
     As an artist, you must traverse a minefield that is filled with “marketing mafia men”.  It is littered with regretful artists who, with rose-colored glasses, jumped at an opportunity that seemed too good to be true.  And unfortunately, too many times, their suspicions proved to be accurate.
     Before you get involved with any marketing plan, here are a few things to consider:

1.     Does your work add to a marketing concept or is your work the entire concept?  Chances are, if the application of the concept hinges entirely on your work, you don’t need the marketing man.  If it’s a good idea, you can do it yourself. 
2.     How does the application affect future sales and collector perception?  If you would be embarrassed for your collector to see a particular application, then go with your gut.  You’ve worked long and hard to create, brand and protect your image.  Think “long term” and act accordingly.
3.     Don’t be the dancing monkey with no backbone.  Run your own show.  Don’t let the middleman marketer run your business.  There’s a magic little word that artists always have a problem using …. NO!  This is your work product and you are branding your image.  If you get bullied into t-shirts or teacups, then you have no one to blame but yourself.
4.  Find a niche.  Many artists’ work can fill a niche for other marketing applications.  Some are good; others will land you in a highway gift shop next to the rubber tomahawks.  Look at all the possibilities and try not to focus on the money.  If you listen to the money, chances are you won’t be happy in the long run.
     I try to consider every opportunity from my collector’s vantage point and think in terms of longevity.  Being a professional means you must entertain all these questions and know how you’re going to play it.  Here’s an example of something that was just presented to me.
     I’ve committed to do 16 paintings for a western cookbook with my good friend Kathy McCraine.  The book is first class and fits my customer’s expectations for my product.  Kathy’s writing and photography blend seamlessly with my work.  We both compliment each other.  So far, no problem.  We’ve agreed to exhibit the paintings at the Phippen Museum for the book release and book signing.  Still no issue.
     The Museum calls and wants to put the cover image (one of my paintings) on cooking aprons for sale in the gift shop.  My spider senses start to tingle.  My friend at the Museum is a savvy marketer with a strong advertising background.  She senses my concern.  We find common ground by agreeing to a very limited run for opening night, along with a high level of quality for the product.  The application is tailored for the event, the quality will be very good, and the supply is limited.  My collectors will see the connection with the event and not see me as embracing the western apron business.  Obviously, these are two very different perceptions.  One involves dignity, and the other replicates a dancing monkey. 

All content © Mark Kohler Studio.         

Tuesday, September 14, 2010

Train Jumping


     I jumped my first train when I was in junior high school.  I met a kid in my homeroom class who knew the ins and outs of truancy, bus riding, note forgery and the likes.  He also knew everything about train jumping.
     Hey, my grandfather was a railroad man…. this might be right up my alley.  So I eagerly signed on to this adventure.  We rode the train from North Austin all the way to McNeil Road (farther North Austin), and then jumped onto a return train and back to our bicycles that we had stashed in a culvert.
     I discovered that train jumping was exhilarating fun and quite the exciting experience.  My parents never found out (although I have a feeling that my mother has fainted in her chair as she is reading this!)  Bad news travels fast these 38 years later.

     So, if you’re an artist, where does this little tale fit in?  Well, I say you should jump the artistic train.  Take a chance and see if exhilaration won’t pay you a visit.  The good thing about train jumping is that it applies to the professional artist as well as the beginner.
     If you’re just starting out, try a few trains.  You’ve got nothing to lose but some time and experimentation.  You will be surprised at what throwing caution to the wind might turn up.  For the more experienced artist, consider this:  We all know that an artistic rut can wreak havoc on our creativity.  Many times we languish in our old ways, stuck with a medium or palette or subject matter that just isn’t the vision we were originally after. 
     Jumping the train for a short run down the rails might be all you need to loosen up and find a new direction or to kindle a new passion.  Jumping the artistic train can be all you need to get back on track, and it’s safer than the real deal.  At least this way you won’t have to stash your bike!
      

Monday, September 13, 2010

5 Good Reasons To Consider Working Small


     I like small paintings.  They are intimate, and require close contact in order to engage with and observe them.  Watercolor, generally speaking, gets a new set of rules once you entertain large sheets of paper.  Washes start to dry before you can cover the given area.  Large paint puddles and big brushes become your tools.  Also don’t forget that large paper requires an art table at least as big as your sheet size, and larger than sheet size is even better.  I’m not knocking large paintings, just be aware of these factors.
Inspired By Chardin
8 x 5

     There are several factors that small paintings have in their favor and that I feel make small paintings a plus.  Here are my top 5:
     1.  Small paintings make you simplify.   From an artist’s perspective, small paintings require seeing and simplifying larger masses, instead of getting caught up in rendering detail.  This is a plus for artists like myself.  If you force yourself to use bigger brushes in a small format, your paintings will have a unity to them.
     2.  They open the door for a new collector.   Many artists seek to open the door to major works by adding giclees or lithographs.  I have found that many collectors would rather stick with originals for the same price as a print.  I try to have several small works for every show, just for these collectors.
      Many artists have giclee prints that range from $500-$2500, and they are often sold through galleries or retail shops.  Many collectors, myself included, would much rather purchase a small original in this same price range directly from the artist.
     This is a generalization, but for the most part, I have found print buyers and original buyers are two different breeds.  Print buyers usually want a larger piece for less money.  People who buy originals are drawn to the painting that elicits an emotional connection.
Reach Around
7 x 4
     3.  They are easier to sell.   This sounds a bit misleading, but the truth is, at any given event there will be more people that can afford to purchase a small work.  Whether the deciding factor is the price point, or the ability to hang small works (as determined by space limitations), most artists can cover the spread with small affordable paintings.
     4.  Collectors can always make room for a small painting.  Even major collectors with large works in their collection will make a move on a small painting. 
     Two years ago, I had the opportunity to enjoy a major collection in Kerrville, Texas.  This gentleman’s collection probably had 100 or more large paintings hanging.  My favorite painting was a small Wyeth painting tucked away in a corner.  Don’t ever discount the power of a well-executed small painting.
     5.  Small paintings are easier to travel with.  For those artists making their living on the road, small works make your job infinitely easier.  They are easier to travel, pack, load and unload.  I always suggest having a couple of large works for the big gun that might show.  But it’s easier to squeeze in one or two large works, if you have a majority of small to medium paintings in your inventory.
     So I hope I’ve proven that bigger is not always better.


All content and images © Mark Kohler Studio.

Saturday, September 11, 2010

Santa Fe Exhibit 2010


Today I'd like to share my latest video with you.  You can travel along with me and then see the opening reception at McLarry Fine Art.  Enjoy!

Video © Mark Kohler Studio.

Friday, September 10, 2010

My Magic Tape Machine


    There it is.  It’s my favorite piece of equipment that doesn’t actually apply paint.  Like I told you in a recent post, I am inclined to find systems for certain tasks.  Maybe it’s a guy thing, but I try and find ways to do things better, cheaper and faster.  With the Marsh taper you can also add less hassles.
     Let’s start at the beginning.  We’ve accomplished an awesome drawing and are ready to stretch our paper to our board.  Many painters pre-wet their paper and use the same brown tape my Marsh taper uses.  Many artists like wetting the sizing in the paper and actually scrub the surface after the damp paper is attached.  I don’t do this, but experiment with what will work best for you.
     Next, we must decide what type of board to use.  Birch drawing boards and masonite work well, but I feel they are cumbersome and heavy to work with in the studio.  My choice is Gatorboard.  We’ve discussed this before, but let’s recap, so no one has to dive into the archives. 
     Gatorboard is two sheets of plastic with a plastic foam core.  The board isn’t affected by moisture, is rigid and light as a feather.
     First I measure my board, and then pull the handle on my taper for that specific length.  The Marsh has a huge roll of brown tape in its storage unit and when the handle is pulled, it dispenses and pre-wets the tape.  When the handle is released, it cuts the tape to your desired length.  This beats a water bowl and sponge all to hell!  The Marsh taper is expensive (around $250) for such a relative task, but remember, I’m all about time saved and being professional.  The Marsh fits the bill.

     Photo #2 shows one taped edge. I then attach the next strip 180 degrees from the first.  This allows me to pull any slack from the painting. 
     This is what your set up should look like now. 

     Proceed with taping the other two sides and keep working the tape’s edge where it meets your painting.  We want all four edges taped with no lifting.  This is what the completed tape application should look like.

     Now, we start attaching our masking tape, which will meet our painting’s edge and overlap our brown Kraft tape.  I only use 3M #230 drafting tape for this part of the preparation.  Hold while I get on my soapbox…. If you get only one thing from my blog, please take my advice on this tape.  Yes, drafting tape is expensive (about $10 per roll) and yes, masking tape from a box store will technically work, but you will eliminate so many potential problems by using this 3M tape.  Here’s a small list why:
1.    The adhesive is the perfect degree of tackiness.
2.    Masking tape will almost always leave residue on your paper.  You are responsible for providing an archivally sound painting.
3.    If you use a dryer masking tape, adhesive will melt into your paper fibers.  This is a “game over” mistake.
4.    Upon completion of the painting, 3M drafting tape peels right up with no damage to paper fibers.  (If you use Lana paper---be careful and pull slowly).
     Back to our demonstration.  Apply your drafting tape from the brown tape toward your painting.  The last strip should be the edge of your painting.  This method also creates a shingling effect so water has a tough time breaching your tape.

     Here’s my painting with all the drafting tape in place. 

The only step left, prior to painting, will be burnishing our tape edges.  I like to use a bone folder (available at art supply stores), and lightly press or burnish my drafting tape.  First, I use the point to press down the corners.  This is usually where paint will breach our tape job.  Don’t get carried away on pressure.

     Now, take your bone folder and use the flat side and seal the bordering edges all the way around your painting.  I will be doing an entire post on the lowly bone folder soon, so see if you can acquire one soon.  Artisans in Santa Fe has some in stock.

     By the way, this will be my upcoming demo painting.  I won’t be foot-stepping this like the last painting, but I plan to photograph the painting in 15-minute intervals.  It should be very instructive.  Pam will post the photo tomorrow, so you can participate in the next couple of weeks, should you choose.  I plan on starting the demo the week of September 20th, so this should give you plenty of time to accomplish the drawing.

All content and photos © Mark Kohler Studio.